Tire rectangles, random blisters, edges, joints or broad sheets point to different questions.
Garage floor problem guide
Why is my epoxy garage floor peeling—and does it need a patch or full removal?
Peeling means at least one layer has lost adhesion or cohesion, but the location alone does not prove the cause. The failure plane, moisture, contamination, old layers, cure conditions and joint movement should be separated before another coat is proposed.
Concrete-to-coating, coat-to-coat and weak-concrete failures are not the same repair.
Apparently good coating must be evaluated before a small patch is assumed to be enough.
Before → solution → after
Repair the failure mechanism—not just the visible color.
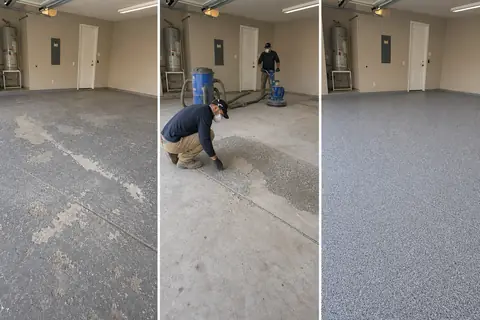
Three separate views now show the actual logic: identify the failed floor, remove and prepare the unsound area, then install the selected finish over a verified substrate.
Map peeling, tire zones, blisters, joints and exposed layers without guessing the cause.

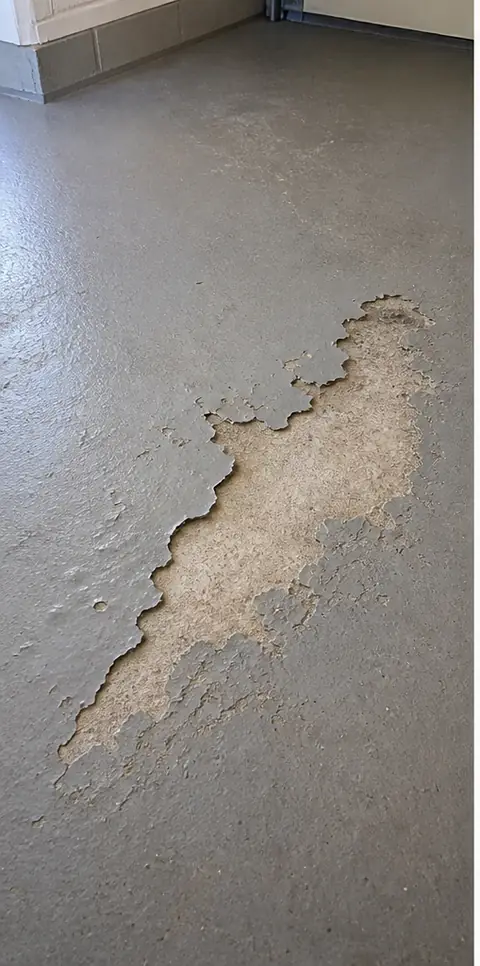
Identify the failed layer, remove unsound material, prepare sound concrete and address moisture, contamination and joint details.
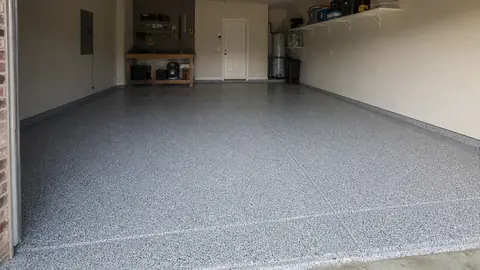
Install the chosen decorative replacement only after the retained substrate and every compatible layer are verified.
Educational before–solution–after sequence. Images explain the decision path and are not represented as one completed Texas Garage Floor Coating Installers project.
Immediate answer
The edge of the peel does not tell the whole story.
If coating releases cleanly from concrete, the issue may involve surface condition, contamination, moisture or preparation. If one coat separates from another, the recoat window, intercoat contamination or compatibility may be involved. If concrete comes away with the coating, the surface itself may be weak.
A useful assessment identifies which material remains on each side of the failure instead of calling every defect “bad epoxy.”
Two safe observations before an estimate
- Photograph the overall pattern and one close-up that shows which layer is exposed.
- Note when it appeared, dampness or salts, previous floor products, installation timing and whether nearby areas sound hollow or lift easily.
Terms in plain language
What the failure may actually be called.
Separation at a boundary, such as coating releasing from concrete.
The material itself breaks, such as weak concrete remaining on the back of coating.
A layer has detached from the layer beneath it.
A raised bubble that may involve trapped air, outgassing, vapor or pressure between layers.
Coating sticks to a warm tire and lifts as the vehicle moves; bond and cure may both matter.
The exact interface or material where separation occurred—the key to deciding what must be removed.
Plausible causes
Six different conditions can produce a similar loose edge.
No single cause should be diagnosed from a photograph. The pattern guides the inspection, then the substrate and coating history supply evidence.
Check 01
Preparation mismatch
Review the application record, product instructions and the visible boundary before choosing a correction. Map where the condition begins and where it is most severe.
Check 02
Oil or silicone contamination
Map the exposure and cleaning history, then verify whether preparation can reach clean, sound concrete. Compare the affected area with adjacent sound floor and retained layers.
Check 03
Moisture through the slab
Map damp edges, weather changes and recurring deposits, then compare the evidence with a documented slab test. Record when the pattern changes and what the garage was exposed to.
Check 04
Weak old coating retained
Test surface strength, profile and the material left beneath the defect—not appearance alone. Review preparation, product history and conditions during installation.
Check 05
Mix, recoat or cure conditions
Compare slab temperature, sunlight, working time, cure history and the actual return-to-use timing. Check the named manufacturer's limits for this exact layer.
Check 06
Crack or joint movement
Classify the line as a static defect, designed joint or active movement before selecting a repair detail. Confirm the sound repair boundary before adding another coating.
Diagnostic sequence
What a specialist should check before quoting another coat.
Map the pattern
Separate tire-zone, random blister, edge, impact and joint-related failures.
Identify the layer
Determine whether concrete, primer/base, broadcast or topcoat released.
Check substrate history
Review coating, sealer, cleaning products, moisture indicators, profile, repairs and joints.
Test the proposed boundary
Evaluate apparently sound areas and confirm compatible removal, preparation and replacement layers.
What is found → what to evaluate
The easy fix is not always the durable scope.
| What is found | What to evaluate | When the shortcut is not enough |
|---|---|---|
| Peeling mainly beneath tires | Cure history, contamination, coating type and bond to concrete | A stronger clear coat cannot repair a weak layer below it. |
| Random bubbles or blisters | Moisture, outgassing, failure plane and application conditions | Popping bubbles leaves the cause and adjacent weak areas unchecked. |
| New coat separates from old | Intercoat preparation, compatibility and old-layer adhesion | Recoat is unsuitable when the retained old layer is broadly weak. |
| Concrete sticks to removed coating | Surface strength and extent of weak material | Coating cannot make unsound concrete a reliable substrate. |
| Failure follows a joint | Whether the joint is static or designed to move | Rigidly bridging a moving joint can repeat the failure. |
| Small isolated impact edge | Boundary of sound adhesion and matching repair products | A patch is poor value if testing shows widespread weak bond. |
What the owner can document now
Evidence is more useful than early removal.
- Keep wide and close photos before loose pieces are removed
- Retain one labeled sample if it detaches without tools
- Mark the boundary with removable tape and date it
- Record rain, washing, leaks, salts or dampness
- List tire dressings, degreasers, solvents and previous products
- Locate joints and note whether failure follows them
Peeling floor FAQ
Six questions before patching or recoating.
Can peeling epoxy be patched?
Sometimes. A localized patch makes sense only when adjacent coating is sound, the failure cause is understood and compatible repair products and details are available.
Does peeling under tires prove the epoxy was cheap?
No. Tire-zone failure can involve heat and pressure, but also preparation, contamination, cure timing and the bond of every layer. Product name alone does not diagnose it.
Can a polyaspartic topcoat stop existing peeling?
No topcoat can restore adhesion below a loose base or old coating. Unsound layers must be addressed first.
Will moisture testing find the cause?
It can identify the slab's moisture condition at the tested locations and time, which is important evidence. It does not by itself rule in or out preparation, contamination or application problems.
Do all cracks need to be filled before recoating?
They must be classified. Static cracks may have compatible repair options; movement joints and active cracks require different detailing and may remain visible.
How do I know whether the whole coating must be removed?
The visible loose edge is only the starting point. Adhesion, failure-plane and soundness checks across apparently good areas help determine whether a bounded repair or broader removal is justified.
Slab-first estimate
Before paying for another coat, identify which layer failed.
Send a wide photo, close-up, installation history, floor use and ZIP code. The final scope should explain why patching, removal, mitigation or a no-install decision fits the evidence.